HOW TO CREATE A TRUECRYPT ENCRYPTED EXTERNAL STORAGE DRIVE USB OR ESATA
Many users end up using external removable media for their server’s important data. Oftentimes this can be done as part of a manual off-site backup process for important data or simply when moving sensitive data off of a server, for example with employee records, company records, litigation files, and mergers and acquisitions related documents that need to be used on a notebook without network access. I have used the TrueCrypt benchmark in many reviews including the new Xeon E3-1280, Xeon E3-1220, E3-1230, dual E5606, and W3550 CPUs, as well as the Sandy Bridge i7-2600K and i5-2500K pieces over the past few weeks. TrueCrypt is one of those awesome open source utilities that can help secure data. One will notice that the 32nm Intel parts have AES-NI and absolutely fly when doing encoding. For most external media, the 32nm parts can encrypt data at a rate many times the media rate which may make the speed seem excessive. However, TrueCrypt can be used on system disks and RAID arrays also which can easily exceed a few GB/s in aggregate transfer rates.
Test Configuration
I am using a Sandy Bridge test bed here as the Cougar Point SATA 6.0gbps controller is perhaps the best 6.0gbps SATA controller on the market at the moment.
- CPU: Intel Core i5-2500K
- Motherboard: ASUS P8H67-M EVO
- Memory: 8GB 1600MHz CL9 DDR3 (4x2GB)
- OS Drive: OCZ Agility 2 120GB
- Additional Drives: Corsair Performance 3 Series P3-128, OCZ Rally 2 4GB USB Drive
- Additional NICs: Intel Gigabit CT PCIe x1 network adapter
- Enclosure: Supermicro SC731i-300B
- Power Supply: Supermicro 300w (included in the SC731i-300B)
Creating the TrueCrypt Volume on an External Drive
First one needs to start TrueCrypt with the external drive attached. For this example, I am using a spare 4GB OCZ Rally2 drive normally on BIOS flash duties. Once this is done select “Create Volume”.
Next, select “Encrypt a non-system partition/ drive”. There are clearly other options here, but the goal of this guide was to show how to encrypt an external non-system drive.
Next one wants to create a “Standard TrueCrypt Volume”, as one will notice from the example of when a Hidden TrueCrypt volume is useful, TrueCrypt does scale for the needs of the paranoid.
Next, select the correct drive to encrypt. The process does require an erase of the drive where all data will be lost, so double or triple check this selection.
Now that the drive is selected, chose Create encrypted volume and format it. Note, the Encrypt partition in place option is only available in Windows Vista and later, so corporate users of Windows XP may not have this option.
To take advantage of the Sandy Bridge and Clarkdale desktop processor, Xeon E3, W3600, E5600, X5600, and L5600 series’ AES-NI acceleration, one can use AES encryption on the following page. Note that there is a link to the benchmark function used in ServeTheHome reviews here.
Selecting the volume size on a full disk encryption is an exercise in futility, the entire drive will get encrypted so just click Next here.
TrueCrypt recommends a 20 to 64 character password on the next screen. Note, one does want to remember this password.
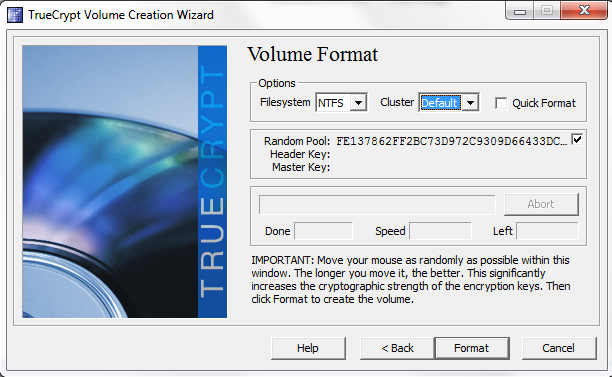
The next screen is perhaps my favorite, select a filesystem (I changed the below from FAT to NTFS) and then move the mouse around to generate random data. Admittedly, as an avid mouse user, generating random data in this way is a bit fun.
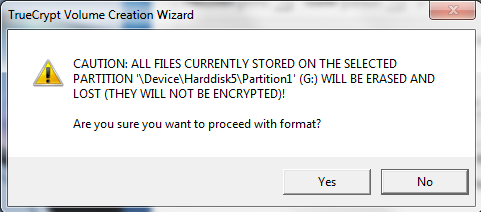
After clicking format in the above, a warning screen will pop up. Read the warning and action it appropriately.
Once this is done one can watch the progress bar move across the screen, or do something else. The reason here that, despite having a AES-NI capable machine and using AES encryption running, the speed is only a few MB/s is because the flash drive is not super fast. USB 3.0 SSDs can do this task at a much higher rate.
That is all there is to it. From here one needs to mount (or auto-mount) the volume on host machines. To undo the encrypted volume, and re-use an unencrypted external drive, one simply needs to right-click on the drive in question and format the drive normally. All data will be lost including the encrypted partition.
Conclusion
Overall I hope this was a helpful guide for those readers looking for a way to encrypt backup drives. Windows Home Server 2011 and Small Business Server 2011 Essentials will both have backup capabilities to external devices making this potentially great option to ensure that removable media, if lost or stolen, does not allow strangers to access data with ease.


Comments
Post a Comment